Showing posts with label Thanksgiving. Show all posts

Friday, November 18, 2011

Freebie Friday: Last Minute Thanksgiving


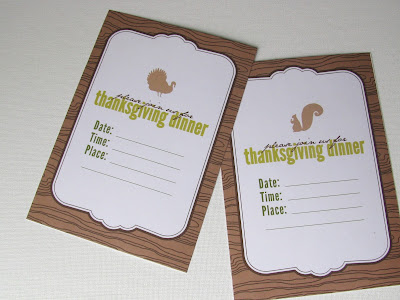
Sunday I volunteered to host Thanksgiving for my husband's family. (Our other option was Golden Corral.) So it's been a bit of a frantic week scrubbing my house and trying to figure out details. But I think I do better with the last minute pressure. It gets my mind working and I usually get more done. It doesn't work so well for sharing all the stuff I've been creating though. But, if you happen to be last minute like me, you can enjoy a free printable thanksgiving invitation, don't worry I sent mine out yesterday.

Click here for the Printable Invitation


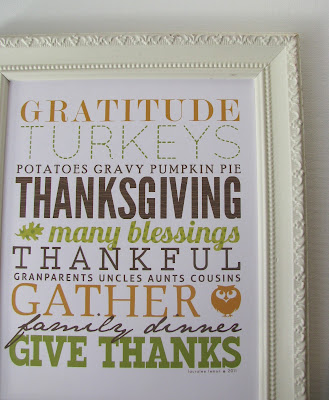
I've also got a coordinating Thanksgiving Subway Art print. Last minute decorating is getting done. Just print, cut down to 8x10 (following the lines) and frame.

Click here for the Thanksgiving Subway Art


If you need some other last minute decorating ideas, you could try the leaf cut outs from last year (a little time consuming for last minute however)


Or frame the fall forest silhouettes found in part here and in my etsy shop here


Oh, and if you need a kid game try the fall memory game here. 

I'm still working on place cards. I want to make them both a favor box and a place card. Still working on how I want to accomplish that. But maybe next week I'll have some super last minute ones for you :)


Sunday I'm also guest posting on Whatever Dee Dee Wants so go check out some other coordinating last minute goodness :)


one more thing (I know a bazillion) remember the ABC Animal Poster giveaway ends Wednesday, so go enter to win a cute alphabet poster . . . think Christmas gifts . . . enter here.


enjoy!

Friday, November 12, 2010

Freebie Friday- Thanksgiving Favor Box

I think this will be the last of the thanksgiving freebies. My mind has moved on to Christmas. Christmas. . . panic. . . excitement! I keep going back and forth. So much to do so little time. But, I'm THANKFUL for Thanksgiving between Halloween and Christmas.


So, put this little 2 inch square box at each guests table on Thanksgiving-or give them away as little gifts, or not . . .

side note: the color in these pictures is a little warm, but in the scribd its a little green (of course every printer prints different too! It'll be a surprise!)

enjoy!


If you can't seem to download this go here.

YellowMums_ThanksgivingFavorBox

Thursday, November 11, 2010

those leaf cutouts . . .

I've been playing around with my leaf cutouts-the insides we didn't use. My two favorite ideas:


Thanksgiving place cards and thank you cards. I used an embossing pen and gold embossing ink. I don't have one of those cool heater things though, so I just held them over the electric burner on our stove. It worked, but my fingers got pretty hot! I used a mini clothespin, but I think I like the pine cone to hold up the place card better! Enjoy!

Tuesday, November 9, 2010

lots of turkeys


I bought this turkey a couple weeks ago with the little buddy. He was so excited to show daddy the "bird." So we had a little talk about what  a turkey is. Since then he seems to really like turkeys. So, we've made lots!

 A thankful turkey, as seen here at Preschool Daze.


 One, that he was suppose to decorate his hand prints with markers. He wasn't into crafting this day . . .


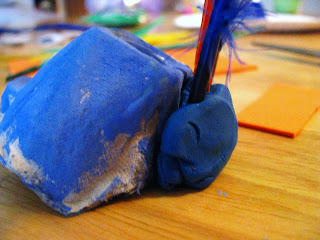
 And this one using an egg carton section painted, with feather stuck in a peice of clay on the back. He really liked painting the egg carton. I think that was his favorite part. So much so, that I'd left to take care of the little sweetie, and the little buddy made this bottom turkey all by himself (he ripped a peice of the egg carton off): I love it! If I'd had orange pipe cleaners hanging around we would have added those sticking out the front. . .


There's some serious googly eye love going on over here . . . could you tell?

Friday, November 5, 2010

Freebie Friday-Fall Leaf Cutouts


First, a little reminder that today is the last day to enter my first ever giveaway. Tomorrow I will announce the winner!

Okay, so I needed some new bunting. This is what I settled on, I liked it enough I thought you might too. I will warn you it's a little bit of a DIY. It may take an hour or two to cut them out if you do a lot. It's worth it! oh, I've also seriously considered sewing a dark brown ribbon along the backs of all of them instead of using clothes pins to hang. Maybe I still will.


You could do lots of other things with these too: They could work as cards, artwork in a frame, or I suppose even for just coloring. I used plain colored card stock, but child's art work would be an awesome background! Or patterned paper. I would just recommend you use highly contrasting papers for the front and back.

okay a couple notes on the pdf (usually these things aren't issues-and I'm sure most of you don't need all the nitty gitty details of how to do it):


The out line- I don't like how a little bit of it may show up in your cut out if your not really careful. I solved that by laying a brown piece of paper (the one I planned to use) under my white "template." I still tried to cut on the outside of the line in case I end up using the template for something else. But, I realize that is more work. If you don't want to use a template, by all means, it's not necessary.


my printer, and most likely yours too will have a little margin around the edge it won't print on. Cut all the way to the edge anyway!


If you don't cut them in fourth first, DON'T connect the two open ends of the leaf. Just start where the line starts and follow it around. to the other end. When you cut them in fourths (with a ruler or paper cutter) It will automatically cut the rest of the leaf out.


Okay, this was my biggest problem: in illustrator (the program I designed them in) the are each 4.25 x 5.5 inches exactly. But for some reason when I print them out, they don't line up right. the maple leaf and two leaves don't go quite to the center, and the oak goes a little over. I haven't resolved it entirely. But I did fix the oak leaf so it doesn't go over. So don't follow the pattern here! Just cut the 11 inch side to 5.5 and the 8.5 inch side to 4.25. ignore the outlines on this one!


I cut a plain piece of white to go behind these. You could glue them, or not. I didn't. I liked the shadow it created. Using 3D squares between the 2 layers would do this nicely. If you're doing a card, you may want to cut them down a half inch on two of the sides to create a little border before gluing it to your card. . .


The one on the left is my template. The one on the right bottom is the only one I used. I will, of course keep the others for future uses though. . .  The actual leaves might be fun as place cards for Thanksgiving. We'll see.

Then I decided I kind of liked it in my living room . . . sorry about the terrible lighting. It doesn't ever get good lighting here. Alas.


And last but not least . . . the printable itself:

YellowMums_Fall Leaf Cut Outs

Friday, October 29, 2010

FF-Fall Memory Game and other tid bits


You guys have had some really great ideas so far for freebie fridays, and I'm definitely going to use some of them. If you haven't yet entered my first giveaway, you can find it here. It ends next Friday, November 5th.


So, for today I've put together a little Turkey Day game to keep you, or the kids, busy while you wait for food :) But, for those of you who may not celebrate Thanksgiving, I've tried to stick kind of close to fall themes. You can download it here. (It's mainly dark brown, but it would print well in black and white if you don't want to use color).

 The three year old buddy and I had fun playing it last night. He did fine for awhile but the 18 matches may have been a little much for his attention span. He was pretty excited about me pulling out the pennies though. He grabbed a hand full and said, "money, money, money" mimicking Ham on Toy Story. I had a good laugh. So if you're playing with preschoolers, I might recommend playing the opposite way: start blank and have them find the matching images and cover them with tokens. That seemed to work better for the buddy.


In other news, I've finally cleaned up my crafting space enough to dare show it to you! But, for your enjoyment, here is the "before" aka. regular look, I'll post the "after" on Monday. (and by "after" I mean the clean, spruced up, want-everyone-to-think-it-always-looks-this-good version).


I promise I didn't make it look worse than normal. I honestly went in and just took a picture. It's terrible, I know.

Friday, October 22, 2010

FF- Squirrel & Oak Silhouettes


The little buddy LOVES squirrels. He likes to chase them whenever he sees them at the park. That's just about every time. It's fun to have them around. I didn't grow up in a place with large bushy tailed squirrels and so it's a bit of a novelty for me too. They're just kinda fun, and make me think of fall.

I thought I'd share some of the squirrel love with this 4 x 6 inch squirrel image and an oak leaf to boot! They're part of the forest animal silhouettes grouping. (The other 3 I'm selling through etsy- don't hate me). Perfect for framing in those glittery frames you've started, I'm thinking gold or green . . . of course I can't use the orange ones now that I said I would. Anyway, get the goods here.

For the turkey, rabbit, and deer check out my etsy shop! For those three type FreebieFriday in the notes to seller box and get a 30% discount. enjoy!


Oh, and in case you're wondering, I'm hosting the downloads through a different place, hence the different link destination.

Friday, November 20, 2009

thankful tree


A friend of mine had this great idea for a thankful tree made from a branch put into a potter. Then you could hang leaves with thankfulness written on them all over it- a great Thanksgiving activity. I loved it, but as I was trying to figure out how to do it in a cute way I had this mental block. My mind doesn't do 3D I've decided. It can, but only with sewing type stuff. My brain has problems. It likes 2D much better. I think the only reason I got an A- in my sculpture class in college was because I was pregnant and the teacher felt sorry for me. Alas. So, I had to make my thankful tree 2D. I'm really excited with the way it turned out. I used gold wrapping paper (from after Christmas clearance last year) and drew a tree outline on the back, cut it out, and taped it to the wall. The leaves are light green, white and brown cardstock. Easy, fun, and I read and think about the grateful words on it every time I walk past. Happy Thanksgiving!

Tuesday, November 17, 2009

Billow Boxes


I bought a frozen turkey yesterday. Actually, I bought a fresh turkey. On my way out of the store I realized my mistake-thanks to a patient buddy I was able to return the fresh turkey and get myself a $16 cheaper and preservable frozen turkey right then and there. I'm so excited Thanksgiving is on it's way, and in honor of that, and the fact that I finally figured out how to link downloadable files in blogger, I'm sharing with you my free "billow" boxes. Perfect for little after dinner mints, treats, or toys. Just remember they really work best printed on card stock. Enjoy. I would love it if you would comment and let me know how you're planning to use them!

Monday, November 9, 2009

cloth napkins


We're excited to have my brother-in-laws family for Thanksgiving this year. I kept telling myself I'd just buy paper napkins-but secretly I really wanted to make some cloth napkins. I just didn't want to stress out about having to do it. Well, I had a little time this weekend and so I just jumped in without thinking too much. Now I'm really glad I did it. I think they'll be more fun than paper napkins . . . now I just have to finalize napkin rings!

*If you've been thinking about making cloth napkins there are lots of great tutorials out there. Purl Bee's has a great post called Molly's Handmade Napkins that uses bias tape around the edge. Cheez Beeper Bebe has 5 different ideas for cloth napkins-all fun. I kept mine simple and just cut twelve 18" squares and sewed two together to make six napkins. (I chose 18" because the length of material I was working with divided evenly into 18). I did 1/2" seam allowances and then flipped them right side out, ironed and top stitched 3/8" around the edge.

LinkWithin

Related Posts with Thumbnails