Showing posts with label decorations. Show all posts

Tuesday, January 31, 2012

In the shop: Animal Shaped Alphabet Toppers


I've just posted these fun Animal shaped alphabet circles


The idea of these toppers was to make my ABC posters a little more accessible, and useable. They are fun on a wall, but I want to use them in more ways. 

The possibilities of these circular little ABC's created by animal bodies are pretty vast. Here are some ideas:

Obviously you can use them as cupcake toppers
How about as a card embellishments
A small gift tag
A monogrammed seal for kids gifts, favor bags, etc . . .
Make a mini word banner for the top of a cake or a small space
Turn into stickers
Make into a matching game
Make into badges or a knecklace


Anyway, pretty fun. Find them here


Wednesday, January 11, 2012

Brown Bag Wreath


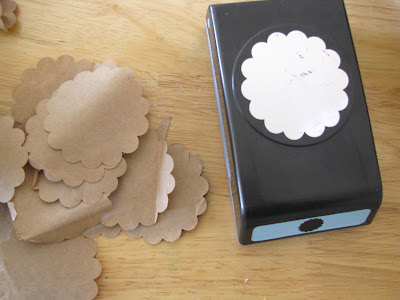
This awesome wreath I was first introduced to on Make Happy. I saw it and knew I needed to make it. But that was over a year ago. I even bought an 1.25 inch scalloped hole punch specifically for this (it's come in handy for lots of other things). But when I took down my Christmas wreath our poor little door looked so bare. I knew the brown paper bag wreath had finally moved up on the priority list. It was time to make it.


I started with a pretty thick brown bag and then moved to what else I had on hand-lunch bags. After starting to put them on the wreath I realized that they weren't quite the same color of brown. So I tried to vary them both through the whole thing to add a little depth. Anyway, a little picture tutorial below. Or you can go to the original in depth tutorial by MaryJanes and Galoshes.


Have a great Wednesday!!

Friday, December 2, 2011

Freebie Friday: Advent in 3 parts


This is a three fold freebie friday, which if I'd been on top of my game, I would have shared with you last friday. My apologies. I finished our advent yesterday. Here it is in all it's glory: and the best part of all: FREE. (if you don't count ink).


First off is the envelope. Find the printable template by clicking here.


My take was to use wrapping paper cut to letter size and CAREFULLY fed through my printer (the expensive thick kind works best, but I used cheap too and it works- but can get jammed in the printer too.) I ended up feeding only one sheet through and then stapling three more sheets under it (NOT inside the outlines of the envelope) and cutting out four at a time-which saved time and printer headaches. folded, and glued.


Second are the advent numbers. Find the printable by clicking here.


I used my 1 1/4 inch hole punch to punch them out- but they are an inch around in diameter (I just don't have an inch hole punch). Glued them to the center of the envelopes.


Third are the advent cards. Find the printable cards by clicking here.
 
These I tailored to my family and our traditions and beliefs. It was a last minute idea to share them. Each card has a scripture and an activity. The scriptures found on the advent include the Book of Mormon and Doctrine and Covenants (abbreviated D&C on the cards). All the scriptures I included are about Christ and/or his birth. As a member of the Church of Jesus Christ of Latter-day Saints I believe in not only the Bible as scripture but also these other two books, and really they are all just wonderful scriptures. The list of activities are things that we do in December and so I just made them our advent. That way I fit in all our traditions, have a timetable and an advent too. I love it. It's a simple way to organize December for me. Feel free to use mine if you wish or to just take ideas to make your own advent cards.


enjoy!

Friday, November 11, 2011

ABC Poster Giveaway


Young, Yippy, Youthful Y is for Yak.  Yahoo. The ABC posters are up in the shop. I've even included a printed option. (well, most of the ABC's are up. The stomach flu this week postponed a few things, alas). So to celebrate we are doing a giveaway!


One printed poster and two printable pdf posters for three different winners. The letter of your choice.


Here's how . . . .

1. Leave a comment telling me your favorite animal
2. Leave a SECOND comment if you follow me
2. Winner will be announced Wednesday November 23


goodluck!

Tuesday, September 20, 2011

Sunshine Wreath


I have to credit the little buddy with this creation. It's true. He came upstairs yesterday with a bunch of broken sticks in his hand and said "he need to build somethin'" Immediatley I remembered seeing this wreath on Delia Creates last year. I loved it, but between all the rain we'd been getting and a 1 month old, I wasn't trekking out to gather sticks.


But this year it was fun. We went on a "stick hunt" and found a bunch of sticks, and scraped a lot of dead bark off and then sat on the sun soaked back steps to start making our "sun."


That lovely sun soon turned into an oven and then the buddy lost interest helping, and ran off to play in the yard, and of course I ran out of sticks and had to persuade the buddy to go on another stick hunt. Back at the porch I heard the sweetie crying--awake from her morning nap. Several glue sticks later, I had the sticks all glued on, and the sticks the sweetie had stepped on glued back on. We went inside for lunch.


I finally went and checked Delia's blog to see how she'd done her wreath-obviously mine was a bit different, but I decided I didn't want it to be a Halloween one as much as a festival fall one. So I added rosettes instead of painting it black. I've never been able to master the rosette before. Every attempt (like 2) have always ended in failure. It's true. But my sister had given me the cutest rosette clip for the little sweetie and so I called her and she walked me through it (here is her online tutorial). Being able to ask her my questions rather than trying to follow a tutorial helped this time. Anyway, I clipped off some little orange twiggy things from some garland I have and wala, I'm so excited about how it turned out! The little buddy told me this morning "I really like your sun! What are we going to put in the middle?" I told him we could put his face :) He didn't think that was a good idea.


Moral of story:
1.  Don't sit in the hot early autumn sun to glue your branches on (the glue doesn't really set well).
2.  Do it when the kids are in bed if at all possible (except the stick hunt of course).
3.  Have an awesome sister to walk you through the tutorial.


*UPDATE: After lots of comments and requests on and off the blog, I've decided to sale some already made wreaths. They are fairly simple to make (although the rosettes are a little tricky) but time consuming. From gathering to finished product takes 4-5 hours. So I've priced them accordingly. If you would like to purchase rather than make one, you can find them at my other etsy shop:

Thanks for all your kind words!

Friday, September 16, 2011

Freebie Friday: My Bones are Ready for Halloween!


Okay, so I KNOW this is a tad early. But my neighbor had a pumpkin on her porch this morning and I've been thinking about pulling out my Halloween decorations for a week now, and I just can't resist anymore!  (I even bought my son's costume on ebay tonight  . . . eek I'm excited.) I may skip back to fall and harvesting and all that fun stuff eventually, but for now it's a Halloween freebie.

Simply print on cardstock and cut down to 8x10. 


Get the Dem Bones Poster here.


enjoy!

Monday, August 8, 2011

ABC Posters Discount & Old Files

Okay,


So here's the deal. I've been getting lots of emails with people wanting my old files-most of which aren't linked up anymore. Here's why: All my old files I hosted through google groups. They've discontinued that service, and so none of the links work. I'm slowly working to re-upload them to scribd and relink them all. Hopefully I will get them done soon. So far I've uploaded all my striped birthday freebies, the dinosaur shapes, and my menu planner. So if you've been wanting a file that isn't working, you can either wait until I can get it uploaded to scribd, or you can email me and I will email you the file! Happy printing!

On to more exciting news:


My latest project, one that I'm very excited about,  my ABC posters that I've added to my shop. I'm still in the designing (aka drawing them free hand on the computer) works, but have finished A-G. Aren't they fun? I'm excited to put some of them up in my own kids rooms. I can see them in a nursery or playroom too! What about to spell out a word? fun fun. Over the next few weeks I will be adding the rest of the alphabet. I'm considering also adding a printed version, comment if you would be interested in that option. It would probably be a little cheaper.


The idea stemmed from wanting to make a funner flashcard set, but there are so many flashcard sets out there, including my own! But OH how I love letters, type and design-the three mixed together just make me want to jump up and down. So, I keep coming back to it. Anyway, in honor of this latest project there will be a 20% off discount code for the next two weeks at my shop. Just type in  ABC0811  in the coupon code box at check out! Happy shopping!


Monday, April 18, 2011

Springified pillow covers


When I think spring I think green. I need green. It helps that my living color scheme revolves around green too . . . so I picked up an olive green sheet at goodwill for maybe $1.50, and used an old white oxford of the honeys to come up with new, basically free pillow covers using this tutorial -without the quilting step. They were quick and easy and I think they pack a punch. Oh, and did I mention the buddy has turned into quite the ham? Yeah, pictures are hard to come by these days without him in them.

Wednesday, February 2, 2011

Tutorial: Star Paper Notes

A cute little package . . .


an eye catching presence . . .

*this one was made folding the white side in in step 2 and out in step 3 (opposite of pix)

and you can write in it!


I can't remember where I learned how to make these. But they are pretty cool, and fun for sending notes, or even hanging up as decorations. And fairly easy to make.

With Valentines coming up I thought it would be a fun tutorial:

*this one was made folding the white side out in step 2 and in in step 3-like the pictures show

First a little note: I'm a very visual learner. A lot of tutorials I just look at the pictures and know how to make it-I don't need to read it. (although a lot of times I wish later I had).  I'm not very good at explaining with words what to do.So, first, I'm sorry I'm bad at explaining, and second, you might want to read through the whole thing before starting.

SUPPLIES:


*Colored/scrapbooking PAPER. (the creases are usually ugly and big with cardstock)
*2-3 foot piece of ribbon/string
*chipboard (I like to use the backs of note books if there fairly stiff-or the back board of a stack of scrapbooking paper)
*Glue ( I use a glue stick because it's not too wet and won't curl your paper-but whatever you want).
*Scissors

optional, but nice:

paper trimmer
bone folder


1. Trim your paper to 5 inches square. (Or 6 if you want it a little bigger-and then you can just cut a 12x12 piece of scrapbooking paper in fourths.) You will need at least 5 sheets to make it big enough to open-but don't do more than 7 or it won't show all the pages open.


I did 6 different colors (I have more paper here because I made a few stars)


2. Fold each sheet in half open, and then fold in half the other direction.  *important. (If you want the colored side to be on the edges instead of in the middle fold it so the color is on the outside for these two folds--see pictures at beginning of post)


so it look like this (Use a bone folder for nice and easy creases).


3. Open it up and fold corner to corner the opposite way (if you've been folding with the colored part in-like the pictures-then fold this one with the colored part out).


This is what it should look like now:


4. line them up and glue the backs together really you are just stacking them on top of each other and gluing facing sides.


I like to keep them folded while you glue so that you only get glue on the part you are gluing.


after I stick them together I open it up and rub the glued part with a bone folder to adhere it well.


Once you've glued them all together it should look like this (they don't like to stay folded shut):

and this:


5. Cut 2 chipboard pieces 1/2 the size of your original page dimensions. So if you cut 5 inch squares for your paper, cut 2 1/2 inch squares for your chipboard.


 6. Cut another piece of scrapbooking paper 1 inch larger than your chipboard. (3 1/2 inches if your going with my measurements).
7. Cover the chipboard with glue and put it in the center of your paper like so: And then cut the edges off with scissors (I just eyeballed it).


8. Glue each side and fold in: like so: Repeat with your other piece of chipboard and paper.


9. Fold your ribbon in half and pinch to find the center.  Put the center on one of the corners of your chipboard and glue in place. Glue your other square and put it about 1/4 inch away with the center pinch of your ribbon in between the two squares.


10. Glue the two empty backs of your paper to the  inside of your chipboard rub down with your bone folder. When it's folded together it should look like this:


Tie a little bow and wala: you are done. Open it up and flatten one of the insides to write a special little note. 

LinkWithin

Related Posts with Thumbnails