Showing posts with label Fall. Show all posts

Friday, November 18, 2011

Freebie Friday: Last Minute Thanksgiving


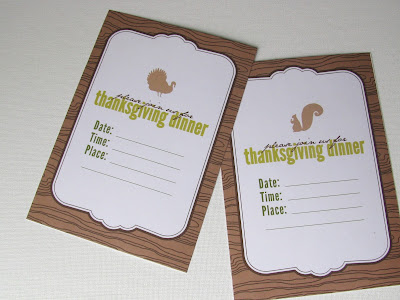
Sunday I volunteered to host Thanksgiving for my husband's family. (Our other option was Golden Corral.) So it's been a bit of a frantic week scrubbing my house and trying to figure out details. But I think I do better with the last minute pressure. It gets my mind working and I usually get more done. It doesn't work so well for sharing all the stuff I've been creating though. But, if you happen to be last minute like me, you can enjoy a free printable thanksgiving invitation, don't worry I sent mine out yesterday.

Click here for the Printable Invitation


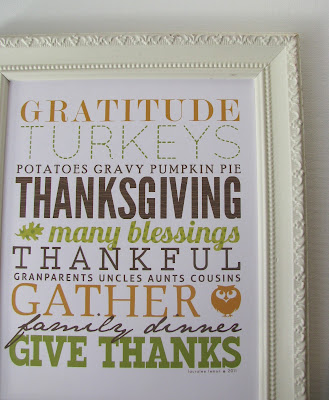
I've also got a coordinating Thanksgiving Subway Art print. Last minute decorating is getting done. Just print, cut down to 8x10 (following the lines) and frame.

Click here for the Thanksgiving Subway Art


If you need some other last minute decorating ideas, you could try the leaf cut outs from last year (a little time consuming for last minute however)


Or frame the fall forest silhouettes found in part here and in my etsy shop here


Oh, and if you need a kid game try the fall memory game here. 

I'm still working on place cards. I want to make them both a favor box and a place card. Still working on how I want to accomplish that. But maybe next week I'll have some super last minute ones for you :)


Sunday I'm also guest posting on Whatever Dee Dee Wants so go check out some other coordinating last minute goodness :)


one more thing (I know a bazillion) remember the ABC Animal Poster giveaway ends Wednesday, so go enter to win a cute alphabet poster . . . think Christmas gifts . . . enter here.


enjoy!

Thursday, October 6, 2011

Peaches


Okay, so canning peaches takes a lot longer than I thought. My first time ever, by myself that is. Here's what I learned:

plan on 20 quarts taking several hours (read: 6-8 hours)
a half bushel (one of those boxes without lids) makes about 12 bottles
when blanching the peaches, it doesn't work very well with unripe peaches. . .  make sure they're ripe, but not over ripe.
don't need an $80 pressure cooker to can peaches, just a $20 water bath canner
put the same temperature of water in the canner that the peaches are (I cold packed them)
even though it only takes 35 minutes (at 4000 feet) to water bathe them, it takes another 25 minutes to get them boiling
only 7 cans fit in the water bath canner, not 12 :)

All in all a great experience and I can't stop staring at those pretty peaches!!


on a side note, I had a lot of peaches so I also froze a bunch. Cut them up, and freeze them on trays before putting them in freezer bags. . . yummy smoothies later :)

Tuesday, September 20, 2011

Sunshine Wreath


I have to credit the little buddy with this creation. It's true. He came upstairs yesterday with a bunch of broken sticks in his hand and said "he need to build somethin'" Immediatley I remembered seeing this wreath on Delia Creates last year. I loved it, but between all the rain we'd been getting and a 1 month old, I wasn't trekking out to gather sticks.


But this year it was fun. We went on a "stick hunt" and found a bunch of sticks, and scraped a lot of dead bark off and then sat on the sun soaked back steps to start making our "sun."


That lovely sun soon turned into an oven and then the buddy lost interest helping, and ran off to play in the yard, and of course I ran out of sticks and had to persuade the buddy to go on another stick hunt. Back at the porch I heard the sweetie crying--awake from her morning nap. Several glue sticks later, I had the sticks all glued on, and the sticks the sweetie had stepped on glued back on. We went inside for lunch.


I finally went and checked Delia's blog to see how she'd done her wreath-obviously mine was a bit different, but I decided I didn't want it to be a Halloween one as much as a festival fall one. So I added rosettes instead of painting it black. I've never been able to master the rosette before. Every attempt (like 2) have always ended in failure. It's true. But my sister had given me the cutest rosette clip for the little sweetie and so I called her and she walked me through it (here is her online tutorial). Being able to ask her my questions rather than trying to follow a tutorial helped this time. Anyway, I clipped off some little orange twiggy things from some garland I have and wala, I'm so excited about how it turned out! The little buddy told me this morning "I really like your sun! What are we going to put in the middle?" I told him we could put his face :) He didn't think that was a good idea.


Moral of story:
1.  Don't sit in the hot early autumn sun to glue your branches on (the glue doesn't really set well).
2.  Do it when the kids are in bed if at all possible (except the stick hunt of course).
3.  Have an awesome sister to walk you through the tutorial.


*UPDATE: After lots of comments and requests on and off the blog, I've decided to sale some already made wreaths. They are fairly simple to make (although the rosettes are a little tricky) but time consuming. From gathering to finished product takes 4-5 hours. So I've priced them accordingly. If you would like to purchase rather than make one, you can find them at my other etsy shop:

Thanks for all your kind words!

Friday, November 5, 2010

Freebie Friday-Fall Leaf Cutouts


First, a little reminder that today is the last day to enter my first ever giveaway. Tomorrow I will announce the winner!

Okay, so I needed some new bunting. This is what I settled on, I liked it enough I thought you might too. I will warn you it's a little bit of a DIY. It may take an hour or two to cut them out if you do a lot. It's worth it! oh, I've also seriously considered sewing a dark brown ribbon along the backs of all of them instead of using clothes pins to hang. Maybe I still will.


You could do lots of other things with these too: They could work as cards, artwork in a frame, or I suppose even for just coloring. I used plain colored card stock, but child's art work would be an awesome background! Or patterned paper. I would just recommend you use highly contrasting papers for the front and back.

okay a couple notes on the pdf (usually these things aren't issues-and I'm sure most of you don't need all the nitty gitty details of how to do it):


The out line- I don't like how a little bit of it may show up in your cut out if your not really careful. I solved that by laying a brown piece of paper (the one I planned to use) under my white "template." I still tried to cut on the outside of the line in case I end up using the template for something else. But, I realize that is more work. If you don't want to use a template, by all means, it's not necessary.


my printer, and most likely yours too will have a little margin around the edge it won't print on. Cut all the way to the edge anyway!


If you don't cut them in fourth first, DON'T connect the two open ends of the leaf. Just start where the line starts and follow it around. to the other end. When you cut them in fourths (with a ruler or paper cutter) It will automatically cut the rest of the leaf out.


Okay, this was my biggest problem: in illustrator (the program I designed them in) the are each 4.25 x 5.5 inches exactly. But for some reason when I print them out, they don't line up right. the maple leaf and two leaves don't go quite to the center, and the oak goes a little over. I haven't resolved it entirely. But I did fix the oak leaf so it doesn't go over. So don't follow the pattern here! Just cut the 11 inch side to 5.5 and the 8.5 inch side to 4.25. ignore the outlines on this one!


I cut a plain piece of white to go behind these. You could glue them, or not. I didn't. I liked the shadow it created. Using 3D squares between the 2 layers would do this nicely. If you're doing a card, you may want to cut them down a half inch on two of the sides to create a little border before gluing it to your card. . .


The one on the left is my template. The one on the right bottom is the only one I used. I will, of course keep the others for future uses though. . .  The actual leaves might be fun as place cards for Thanksgiving. We'll see.

Then I decided I kind of liked it in my living room . . . sorry about the terrible lighting. It doesn't ever get good lighting here. Alas.


And last but not least . . . the printable itself:

YellowMums_Fall Leaf Cut Outs

LinkWithin

Related Posts with Thumbnails