Showing posts with label flowers. Show all posts

Tuesday, September 20, 2011

Sunshine Wreath


I have to credit the little buddy with this creation. It's true. He came upstairs yesterday with a bunch of broken sticks in his hand and said "he need to build somethin'" Immediatley I remembered seeing this wreath on Delia Creates last year. I loved it, but between all the rain we'd been getting and a 1 month old, I wasn't trekking out to gather sticks.


But this year it was fun. We went on a "stick hunt" and found a bunch of sticks, and scraped a lot of dead bark off and then sat on the sun soaked back steps to start making our "sun."


That lovely sun soon turned into an oven and then the buddy lost interest helping, and ran off to play in the yard, and of course I ran out of sticks and had to persuade the buddy to go on another stick hunt. Back at the porch I heard the sweetie crying--awake from her morning nap. Several glue sticks later, I had the sticks all glued on, and the sticks the sweetie had stepped on glued back on. We went inside for lunch.


I finally went and checked Delia's blog to see how she'd done her wreath-obviously mine was a bit different, but I decided I didn't want it to be a Halloween one as much as a festival fall one. So I added rosettes instead of painting it black. I've never been able to master the rosette before. Every attempt (like 2) have always ended in failure. It's true. But my sister had given me the cutest rosette clip for the little sweetie and so I called her and she walked me through it (here is her online tutorial). Being able to ask her my questions rather than trying to follow a tutorial helped this time. Anyway, I clipped off some little orange twiggy things from some garland I have and wala, I'm so excited about how it turned out! The little buddy told me this morning "I really like your sun! What are we going to put in the middle?" I told him we could put his face :) He didn't think that was a good idea.


Moral of story:
1.  Don't sit in the hot early autumn sun to glue your branches on (the glue doesn't really set well).
2.  Do it when the kids are in bed if at all possible (except the stick hunt of course).
3.  Have an awesome sister to walk you through the tutorial.


*UPDATE: After lots of comments and requests on and off the blog, I've decided to sale some already made wreaths. They are fairly simple to make (although the rosettes are a little tricky) but time consuming. From gathering to finished product takes 4-5 hours. So I've priced them accordingly. If you would like to purchase rather than make one, you can find them at my other etsy shop:

Thanks for all your kind words!

Tuesday, January 18, 2011

headbands & clips


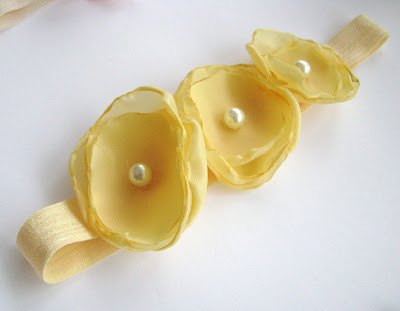
This last week I and a friend made a bunch of headbands-well, most of them are clips that can clip onto a headband. I was inspired by these headbands on Homemade by Jill. I learned two things-they are very addicting to make-even now I have more ideas of things I want to try. And two, they take more time than I think they are going to-pretty much like every craft I think I can whip up in a few minutes, eh? Anyway, they were fun, and now the little sweetie is more identifiable as a girl even with her little fuzzy duckling hair :)

Monday, September 13, 2010

psudo Tutorial: Rosette headband


I have a little dish on my dresser where odds and ends hang out. Mostly jewelry and hair accessories I'm too lazy to put away, change, you know that stuff. . . I was digging through it a couple of days ago and made a little connection. I had a left over rosette from making this, and a piece of shiny elastic. I thought, why not sew that rosette on the elastic-I actually had another rosette floating around as well, and make one of those hairbands that have sprouted up everywhere. It was super easy, and well, I thought I'd show you how I did it. I don't know how clear it will be though, hence the post title.

Need:

jersey fabric sewn into a rosette. (find rosette tutorial I used here.) The bigger rosette is simply a strip of jersey twice as long as the little one.

elastic headband (or shiny elastic)

scrap of felt

needle and thread.


1. cut out a piece of felt the same size as the bottom of your rosette.
2. sew the felt onto the underside of the elastic/headband. I'm betting that their is no "underside" to the elastic headbands-but there was to my elastic-and I did the little one wrong.
To sew the felt on I went through the center of the elastic and then up on the outside of it through the felt so that it made a bit of a crows foot pattern on the felt-that way the elastic won't curl. I don't know if this is really necessary-or clearly explained :)
3. Sew the rosette onto the felt sandwiching the elastic/headband between the two.
This is what my completed headband looks like on the back: I didn't sandwich the little one, and I don't think it will hold up as well.

Wednesday, August 25, 2010

singed flowers


You've seen those flower tutorials all over where you burn the edges of some synthetic material and make a flower. well, I thought, why not use them as embellishments for cards? cheap, easy, and I can make them as thin or simple as I need (aka-so they'll go through the mail). It would even be fun to make it a clip so it could come off and be used as an accessory. . . so many options!

check out flower tutorials here, and here, and here.

LinkWithin

Related Posts with Thumbnails